Chicken Tempura Roll: The Ultimate Crispy Delight Recipe
Chicken tempura roll is a delightful fusion of flavors and textures that will make your taste buds dance with joy! Imagine tender, juicy chicken enveloped in a light, crispy tempura batter, all rolled up with fresh veggies and perfectly seasoned sushi rice. Each bite offers a satisfying crunch followed by a burst of savory goodness, making it an irresistible treat for any occasion. Serve it with a zesty soy sauce or a tangy dipping sauce for an extra kick. Get ready to impress your friends and family with this fun and delicious recipe!
Table of Contents
Why You’ll Love This Recipe
- Enjoy a crispy, golden exterior that’s simply irresistible.
- Experience a delightful blend of flavors with every bite.
- Perfect for impressing guests or treating yourself on a cozy night in.
- Easy to make at home with accessible ingredients.
- Customize with your favorite dipping sauces for a personal touch.
chicken tempura roll
Ingredients
Equipment
Method
- Collect all the essentials: boneless chicken breast, tempura batter mix, cold water, sushi rice, nori sheets, cucumber, avocado, and your favorite dipping sauce.
- Slice the chicken breast into thin strips. This will help them cook evenly and fit perfectly in your roll.
- In a bowl, mix the tempura batter with cold water according to package instructions. The colder, the better for that crispy texture!
- In a deep pan, heat vegetable oil to 350°F (175°C). You want it hot enough to fry but not smoking!
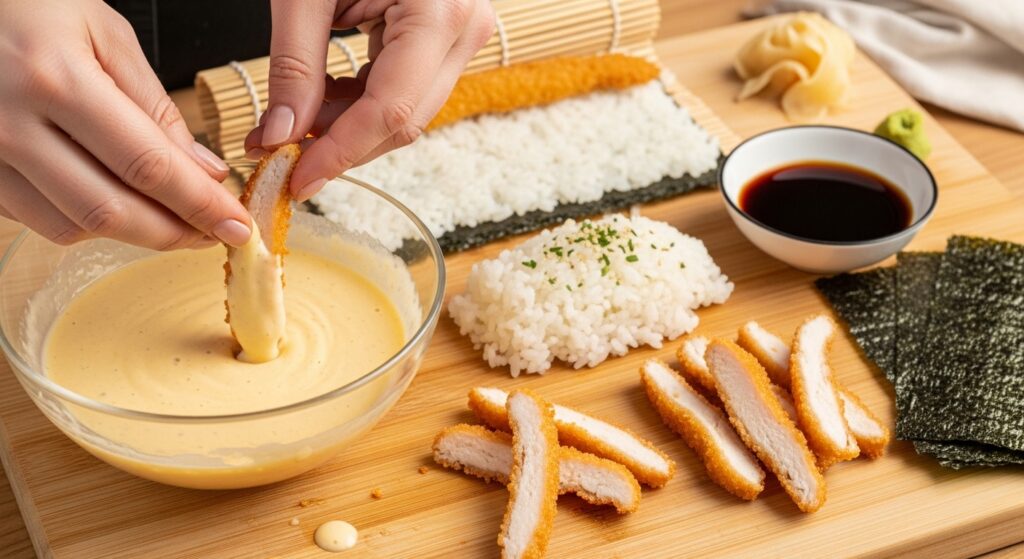
- Dip each chicken strip into the tempura batter, then carefully place it in the hot oil. Fry until golden brown, about 3-4 minutes. Drain on paper towels.
- Rinse the sushi rice under cold water until the water runs clear. Cook according to package instructions, then let it cool slightly.
- On a bamboo mat, lay a nori sheet shiny side down. Spread a thin layer of sushi rice over the nori, leaving a small border at the top.
- Place a few strips of fried chicken, cucumber, and avocado in the center of the rice-covered nori.
- Using the bamboo mat, carefully roll the nori away from you, tucking in the fillings as you go. Keep it tight but not too tight!
- With a sharp knife, slice the roll into bite-sized pieces. Serve with your favorite dipping sauce and enjoy your crispy chicken tempura rolls!
Notes
| Calories | Fat | Protein | Carbs |
|---|---|---|---|
| 350 | 15g | 25g | 30g |
Recipe Snapshot
| Feature | Details |
|---|---|
| Category: | Appetizer |
| Cuisine: | Japanese |
| Prep Time: | 20 minutes |
| Cook Time: | 10 minutes |
| Total Time: | 30 minutes |
| Dietary: | Gluten-free option available |
| Serves: | 4 |
| Best Served: | With soy sauce and wasabi |
Ingredients

- Chicken breast – a tender protein base for your roll.
- Tempura batter mix – for that light, crispy coating.
- Ice-cold water – helps achieve the perfect tempura texture.
- Vegetable oil – essential for frying to golden perfection.
- Avocado – adds creaminess and balances the crunch.
- Cucumber – provides a refreshing crunch.
- Seaweed sheets (nori) – wraps everything together beautifully.
- Soy sauce – a classic dipping sauce for added flavor.
- Wasabi – optional, for those who enjoy a spicy kick.
Ingredients with measurements will be right under the article in the recipe card.
How to Make the Recipe
Get ready to whip up some delicious chicken tempura rolls! Follow these fun and easy steps to create a crispy delight that will impress everyone.
Step 1: Gather Your Ingredients
Collect all the essentials: boneless chicken breast, tempura batter mix, cold water, sushi rice, nori sheets, cucumber, avocado, and your favorite dipping sauce.
Step 2: Prepare the Chicken
Slice the chicken breast into thin strips. This will help them cook evenly and fit perfectly in your roll.
Step 3: Make the Tempura Batter
In a bowl, mix the tempura batter with cold water according to package instructions. The colder, the better for that crispy texture!
Step 4: Heat the Oil
In a deep pan, heat vegetable oil to 350°F (175°C). You want it hot enough to fry but not smoking!
Step 5: Fry the Chicken
Dip each chicken strip into the tempura batter, then carefully place it in the hot oil. Fry until golden brown, about 3-4 minutes. Drain on paper towels.
Step 6: Cook the Sushi Rice
Rinse the sushi rice under cold water until the water runs clear. Cook according to package instructions, then let it cool slightly.
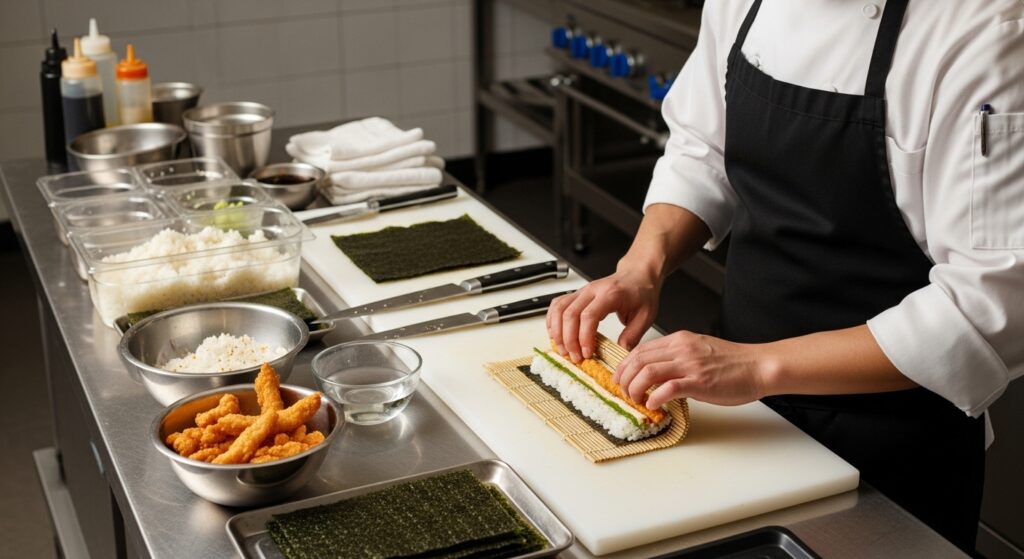
Step 7: Assemble the Roll
On a bamboo mat, lay a nori sheet shiny side down. Spread a thin layer of sushi rice over the nori, leaving a small border at the top.
Step 8: Add Fillings
Place a few strips of fried chicken, cucumber, and avocado in the center of the rice-covered nori.
Step 9: Roll It Up
Using the bamboo mat, carefully roll the nori away from you, tucking in the fillings as you go. Keep it tight but not too tight!
Step 10: Slice and Serve
With a sharp knife, slice the roll into bite-sized pieces. Serve with your favorite dipping sauce and enjoy your crispy chicken tempura rolls!
Pro Tips for Making the Recipe
• Use cold water for the tempura batter to achieve extra crispiness.
• Don’t overcrowd the frying pan; fry in batches for even cooking.
• Experiment with different vegetables like sweet potatoes or zucchini for added flavor.
• Serve immediately for the best texture; tempura is best enjoyed fresh.
• Pair with a homemade dipping sauce for a delightful finish.
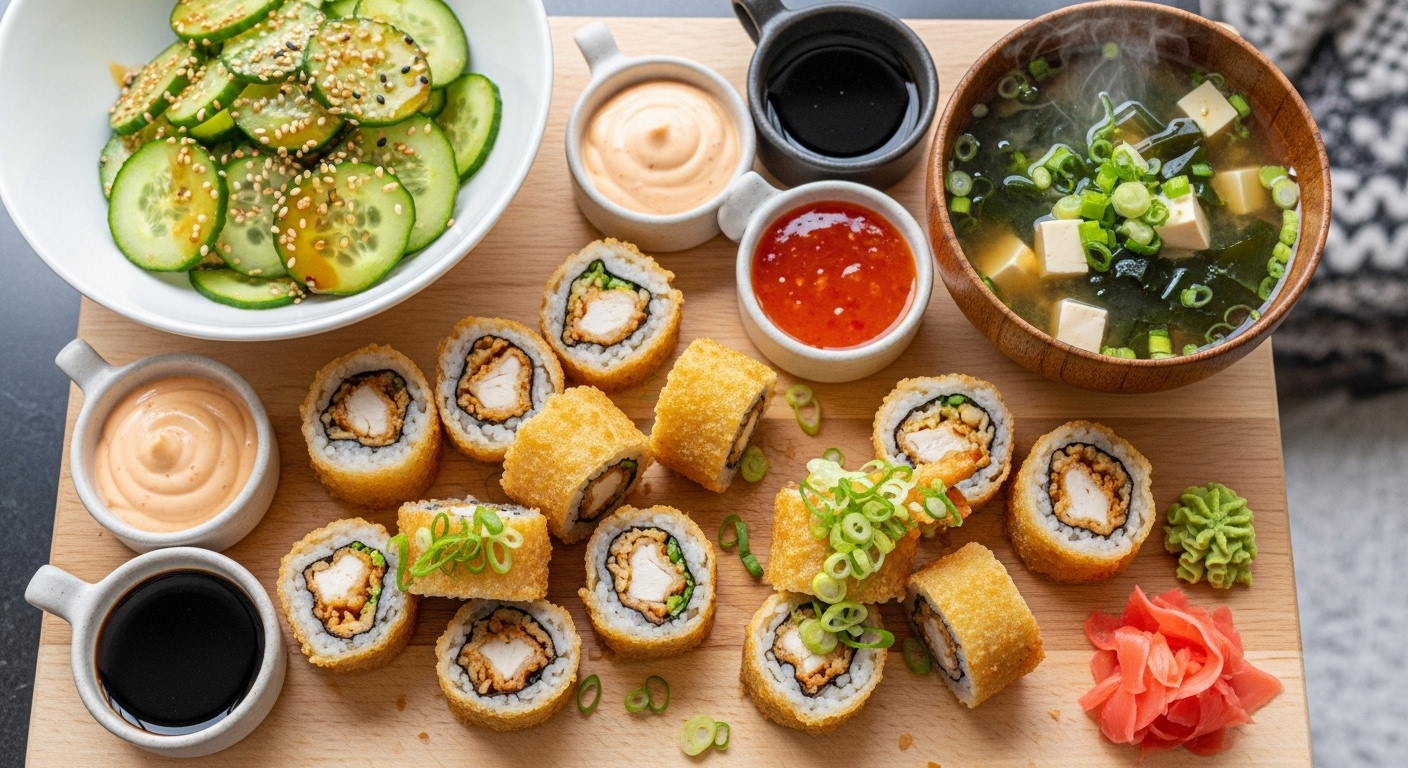
How to Serve

Enjoy your chicken tempura roll in these delightful ways:
- Serve with a side of soy sauce for dipping.
- Add a splash of spicy mayo for an extra kick.
- Pair with pickled ginger to cleanse the palate.
- Garnish with sesame seeds for a nutty flavor.
- Include a side of fresh cucumber salad for crunch.
- Try it with a drizzle of teriyaki sauce for sweetness.
- Complement with a bowl of miso soup for a complete meal.
- Enjoy alongside steamed edamame for a healthy snack.
- Serve with a refreshing green tea to balance the flavors.
Make Ahead and Storage

Proper storage of your chicken tempura roll ensures it stays delicious for later enjoyment.
Storing Leftovers
- Allow the rolls to cool completely before storing.
- Wrap each roll tightly in plastic wrap.
- Place wrapped rolls in an airtight container.
- Store in the refrigerator for up to 2 days.
Freezing
- Cool the rolls completely before freezing.
- Wrap each roll in plastic wrap, then in aluminum foil.
- Label with the date and type of roll.
- Freeze for up to 2 months for best quality.
Reheating
- Thaw rolls in the refrigerator overnight before reheating.
- Preheat the oven to 350°F (175°C).
- Place rolls on a baking sheet and cover with foil.
- Heat for about 10-15 minutes until warmed through.
- For extra crispiness, uncover for the last 5 minutes.
FAQs
What type of chicken is best for tempura rolls?
For chicken tempura rolls, boneless, skinless chicken breasts work best. They are tender and cook quickly, ensuring a crispy exterior while remaining juicy inside. You can also use chicken thighs for a richer flavor if you prefer.
Can I make the tempura batter ahead of time?
It’s best to prepare the tempura batter just before frying. This ensures maximum crispiness. If you need to prepare it in advance, keep it in the fridge and use it within a few hours for the best results.
What can I serve with chicken tempura rolls?
Chicken tempura rolls pair wonderfully with soy sauce, wasabi, and pickled ginger. You can also serve them with a side of edamame or a fresh salad for a complete meal.
How do I store leftover chicken tempura rolls?
Store leftover chicken tempura rolls in an airtight container in the refrigerator for up to two days. To reheat, place them in an oven to maintain their crispiness instead of using a microwave.
Final Thoughts
There you have it, your very own Chicken Tempura Roll! It’s crispy, delicious, and oh-so-satisfying. Remember, cooking can be a joyful adventure, and this recipe is a perfect way to bring a little fun into your kitchen. So gather your loved ones, roll up your sleeves, and enjoy every bite of this delightful dish. Happy cooking, and may your tempura rolls always be crispy!
Hungry for more delicious creations? Browse our site for more recipes and endless inspiration to spark your next culinary adventure!